
The Barn Renovation
Aside from marrying Flannery and having two beautiful children, renovating this barn may be one of the greatest achievements of my life. I am not entirely sure how it happened, but over the past year I found myself painstakingly transforming our 1950s dairy barn into something almost magical. Without having any formal education in carpentry, this project taught me a lot more than any textbook and it was certainly more fun than reading one. With minimal risk involved, I kept telling myself that no matter what I do, I certainly can’t make it worse than it already is. With a set of power tools, Youtube, and a lot of muscle I decided to set to work in May 2022.


It all started when large sections of shingles started peeling off the roof after a wind storm. We first attempted to patch the shingles ourselves and that only lasted a few months. We didn’t seriously consider tearing down the barn, which is often the fate of other dairy barns. However, we weren’t really sure what we would use it for. We just knew it was worth preserving.


We first secured the roof with steel. Without a protected roof there would be no sense in putting any work or money into it. After a few phone calls and text messages we had two estimates out of Granger, Iowa. We hired a crew of Amish to do the work (563-547-5971). With the roof set to be finished in July, we started working on the exterior of the barn over Memorial Day weekend. Now that we had invested the money into the building, we wanted to get some use out of it!
Our second child, Neely, was born on May 6. My family decided to come visit and not only see the new baby, but help pressure wash the outside of the barn. I rented a pressure washer and Nifty Lift 4x4 Boom from Decorah Rental. Within just a day, we had stripped most of the paint from the barn that could be removed.
The next step was the paint. I used five 5-gallons pails of Behr white barn and fence paint from Home Depot. I also rented the Nifty Lift a second time along with a paint sprayer. Over the course of just two days, I hand scrapped and applied two coats of fresh paint to the barn. Additionally, I tacked down loose boards with new nails and replaced the old windows from Recycled Products out of Monticello, Iowa. This company was so good to work with. They had excellent customer service, customized every window we needed (not all original barn windows are the same size) and used all recycled products to construct these built to last windows.
With a new roof and paint job, the barn had an entirely new face-lift. The difference was shocking to say the least.

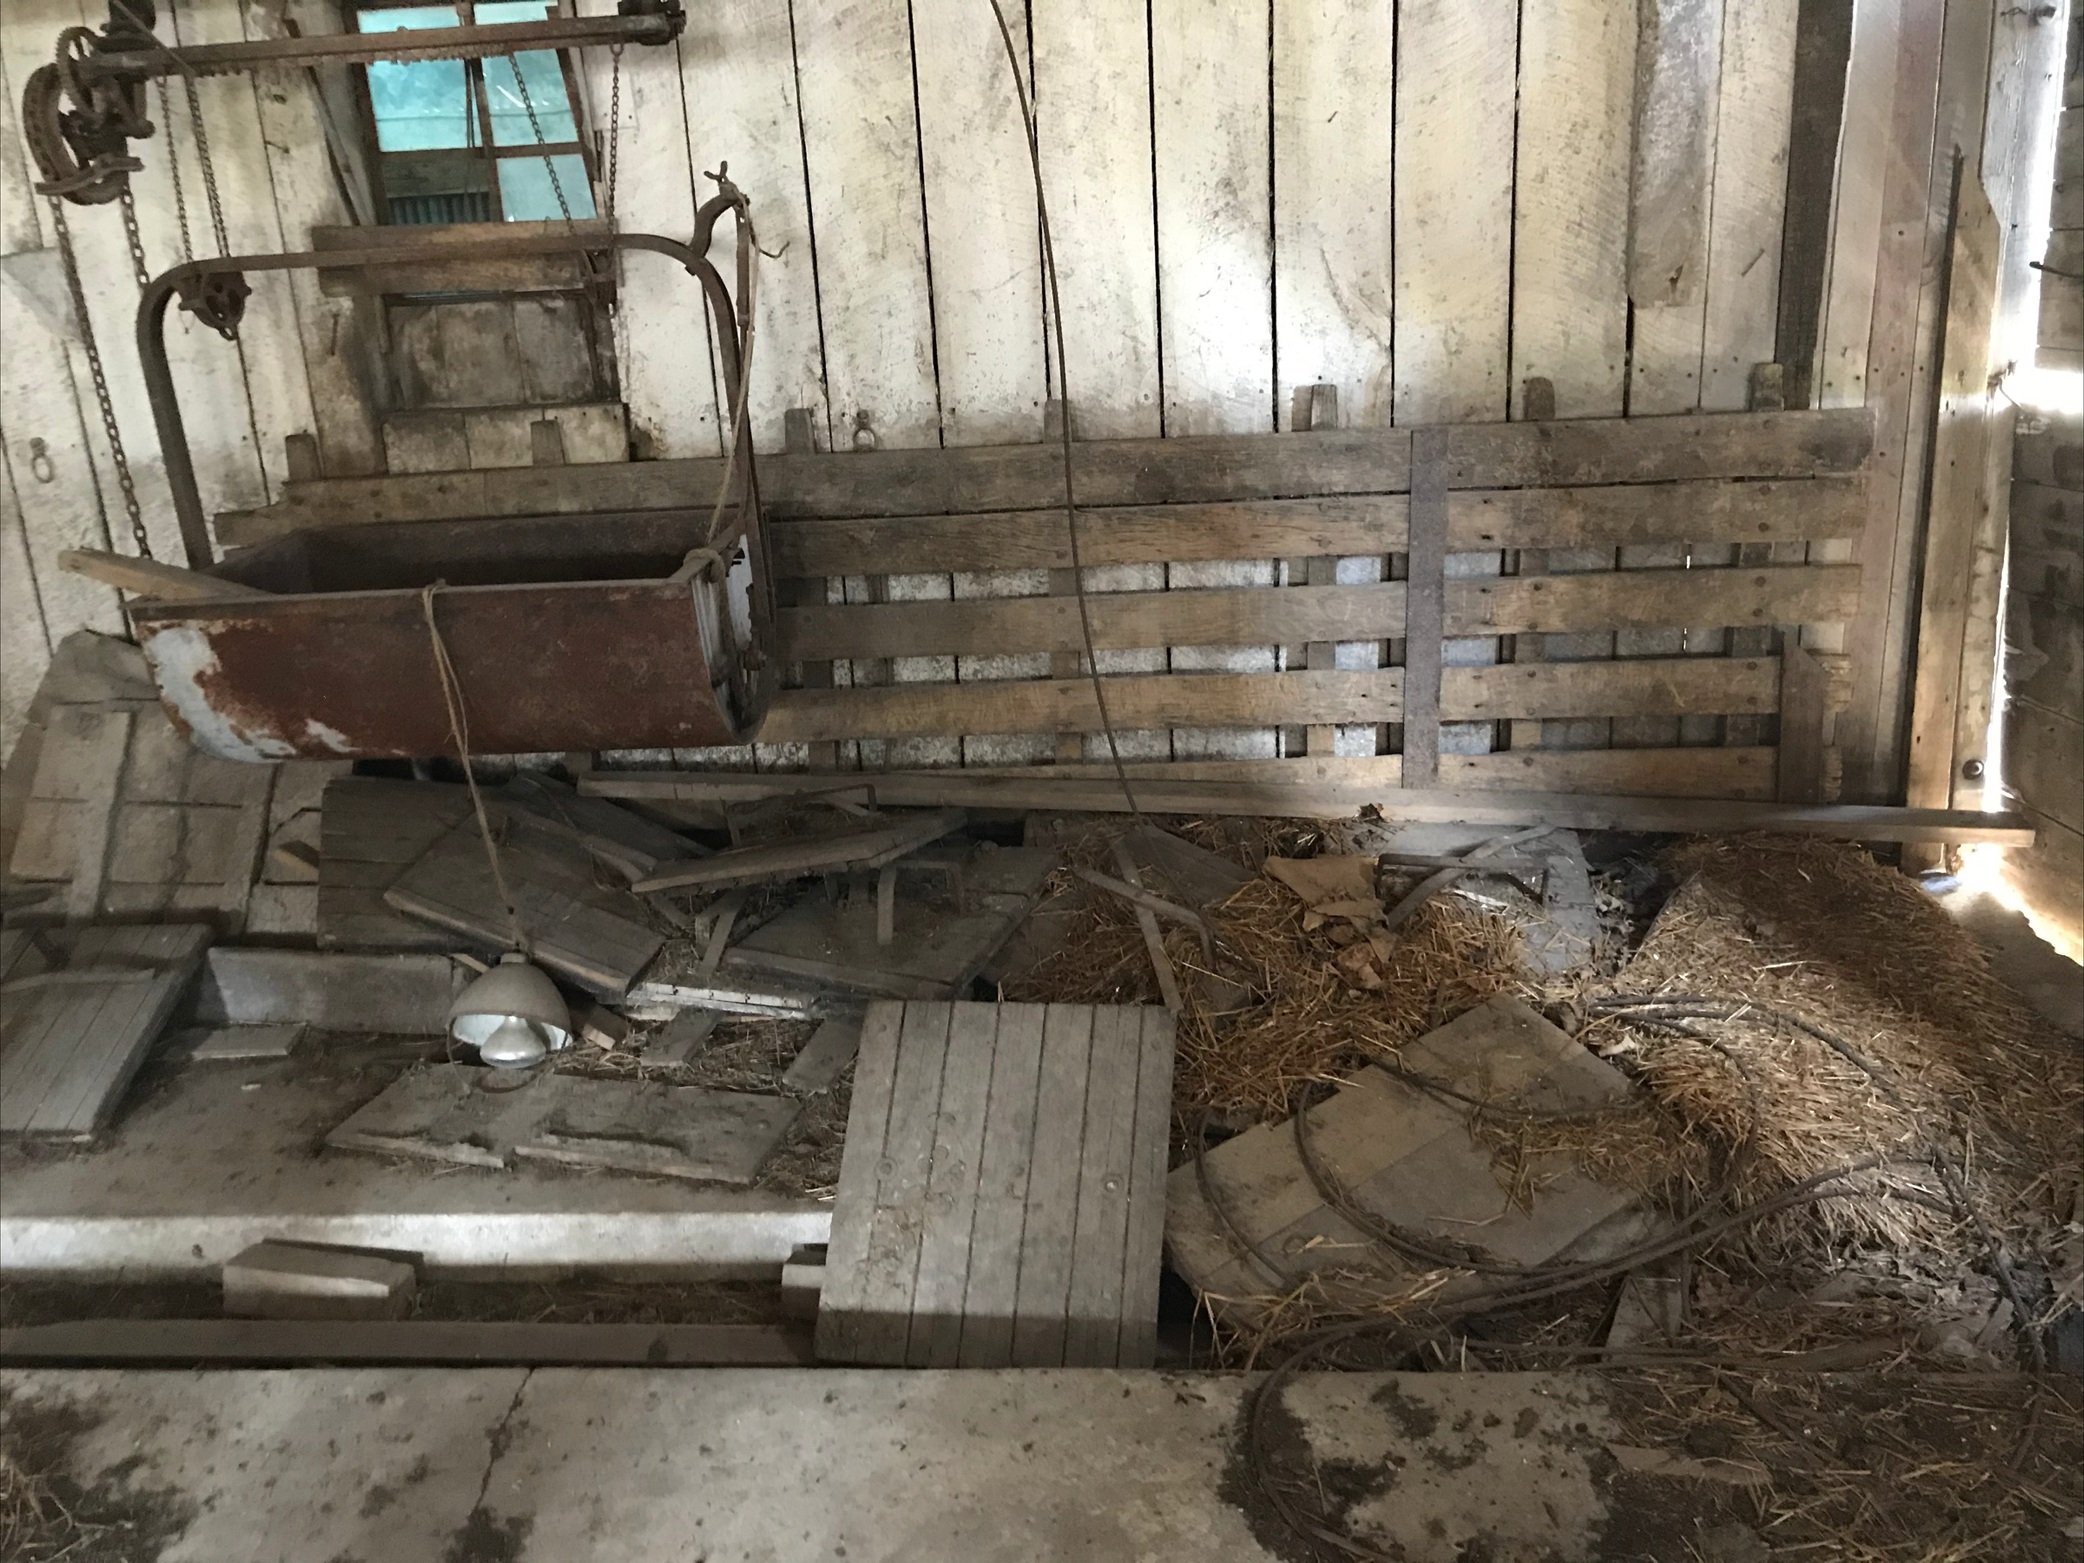
Yet, that was just the outside. The inside was still in rough shape. Structurally the barn was fine, but the years of neglect had left six inches of straw and raccoon skat in the hay loft. Where rain had managed to leak into the barn, that straw was molding and rotting through he hay loft floor. The downstairs was just as disgusting and still retained the original milking stanchions and feeding stalls.
To start the cleaning process I decided to start up high and work down. This meant starting to remove the straw, skat and dust from the loft. The challenge was that I could not see the sub-floor to know where it was safe to stand or where I’d potentially fall through. I also could not wear both a N-95 face mask and goggles at the same time because the goggles would fog. I opted to protect my lungs over my eyes. Laying down a 4x4ft sheet of plywood to safely stand on, I started broom and shovel the debris toward the bale chutes located on either side of the barn. Afterward, my eyes were puffy and red for days, but the loft was looking much better already. I continued to do the same on the ground floor until the bulk of the debris was taken out of the barn.


Now that I could see the entire hay loft floor I discovered large sections that were completely rotted away along with the joists underneath. Before I could even start laying down a new floor on top, I had to replace and add new 2x10” joists underneath and 3/4” plywood on top. With a 20V Dewalt reciprocating saw, I cut out the joists and flooring that were unusable. I then screwed the plywood down and patched any other rotten areas in the same way.
While I was working on the barn a few hours a day when time allowed for it, Flannery was relentlessly searching for used flooring on Facebook Marketplace. The challenge we had was finding enough flooring to cover the 2,200 square feet we needed. At one point we even considered just buying new CDX plywood from Home Depot, which would have been a shame. At last, Flannery found a post about used bleacher boards from Winona State University. With the help of my Dad and his truck and trailer we hauled the entire load in a day and stored it in the barn. My brother, Garrett, then helped lift each board up through the rotten floor where then I then stacked the wood piece-by-piece.

Before laying down the new flooring I asked a few local carpenters for their opinion. Both Todd Neal and Paul Cutting agreed that I should use a moisture barrier. I opted for #30 tar roof underlayment from Home Depot. They also recommended running the new boards perpendicular to the existing floor boards. This would add strength and prevent any warped or uneven sections of the floor from being visible. To nail the floor, they recommended using a nail gun, set to recess the nails 1-2mm. This way, if I ever decided to resand the floor I wouldn’t have to worry about the nails. The nails I used were Grip-Rite collated ring shanked from Home Depot. As bleacher boards, they were not tongue and grooved and that left me with no choice but to face nail them down.

Over the winter break of 2022 I finished preparing the sub floor and began laying down the felt moisture barrier with 1/2” staples. Once the barrier was down, I started laying down the new boards beginning in the middle of the barn. I made sure to randomize the boards so that no two identical boards were adjacent to one another. Piece-by-piece the barn started to transform itself into something greater than we had imagined.

Old Armory BBQ restaurant (Decorah ,IA) with arched windows now installed in the barn
During this time Flannery happened to see a post on Facebook Marketplace for a pair of arched windows for sale in Decorah, Iowa. We discovered the windows were from the original post office in Decorah, now the public library. There were originally four windows in the early 1900s when first installed. One of the original windows is still located in the library. The other three were installed at a restaurant located on Water Street in downtown Decorah. When the restaurant closed and the building was being remodeled, one of the other windows broke during removal. The other two were now in our possession and while we weren’t entirely sure where to put them, we knew they were so special that they were too hard to pass up.

While laying down the floor was going faster than expected, everything came to an abrupt stand still when I got to the north and south ends of the barn. Here I had to close off the two existing bale chutes. For those who have never been in a barn, this was where the farmer would throw down bales for the cows. It was also the only way to access the upstairs from inside the barn. That meant, once I sealed off the chutes I would have to make a staircase with a new access point. We opted not to add a staircase on the exterior of the barn where it would weather from sun, rain and snow. Instead, I removed two joists on the NW corner of the barn creating a 6x16ft hole in the floor.
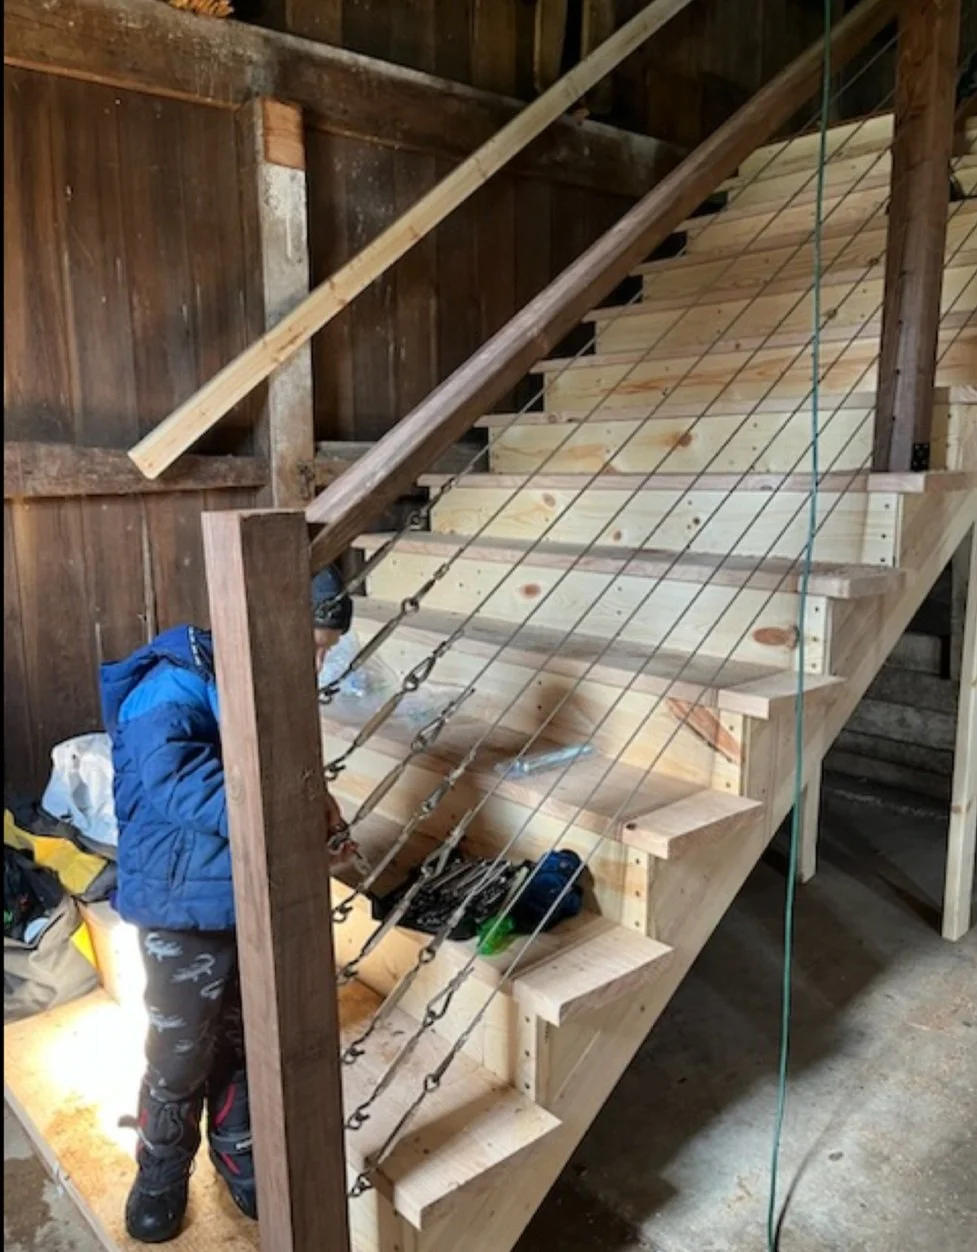
Going into this project I would have never imagined the stairs to be the most challenging “step” in the process. If I ever have to teach geometry class, I would make my students build a staircase. The complexity of angles and math made my head spin. Without my Dad’s knowledge and steady hand I would have probably had to call SOS when so close to the finish. Instead, we now have a set of stairs that aren’t only functional, but a memory I’ll always share with my Father. Thanks, Dad.

At last, the stairs were installed and now we could continue with the railing and banister. We opted for galvanized steel uncoated wire rope with turnbuckles for the railing. For the upstairs banister we used rebar, which Flannery painted black and I cut down to 30” with a 20V DeWalt Speed Grinder. For the framing we used cedar tone pressure treated lumbar because the color best matched the interior wood.

Everything was now finished except the arched windows. After sitting on the idea for many months we finally decided where to put them. The west wall of the barn made the most sense. The barn beams were already framed nearly to size, which required very little framing on my end. It also meant more daylight exposure, providing lots of natural light during the day and provide a sunset view in the evening. Over the weekend of July 4, 2023, Flannery and I made the last few measurements and held our breaths when we cut two huge holes in the side of the barn. As soon as the boards fell out and the light shone in, we knew we had made the right decision.

Flannery finished the final touches and together we set the windows into their, hopefully, final resting place. Without a doubt, the two windows transformed the barn into something beyond comprehension. We now have a lovely space for the kids to run and bike indoors on rainy days, to host gatherings on the farm, and of course, I am already envisioning a new gym for winter training.
Even weeks after completing this project, we still look out at the barn now and wonder if it is really ours to own. What was not long ago just a big building to block the east wind, is now so much more. I hope this feeling of appreciation never fades and that our visitors share this feeling with us.

Written by Adam Bohach